

ducle
How to build an outdoor dining table
by , 05-18-2023 at 11:15 PM (406 Views)
What are you gonna do to make your outdoor space more attractive this summer? Absolutely a new outdoor dining table. Outdoor dining tables are a great place to hang out and have meals with your family or friends. Having a meal outside also gives you a picnicky vibe.
A DIY outdoor dining table is an incredible addition to your patio. But your budget might not agree with you, right? To your rescue, weve compiled some fantastic DIY outdoor dining table ideas you can do yourself. If youre into woodworking, youll for sure have a lot of fun doing these projects.
WHY SHOULD YOU MAKE AN OUTDOOR DINING TABLE?
Whether youre entertaining or just enjoying a cup of coffee and snack solo, theres nothing quite like alfresco dining. An outdoor dining set lets you enjoy meals with family and friends while also taking in the view and fresh air. Its perfect for Sunday afternoon cookouts with family, hosting dinner and drinks with close friends, and many other forms of summertime entertainment that center around food and the outdoors!
When you add an outdoor table to an outdoor recreational area like a park, you are creating an inviting place where your guests feel comfortable relaxing. This will help people enjoy your recreational area and want to stay longer, even dining in for a meal at your location instead of leaving the premises and potentially never coming back.
Outdoor tables also make the perfect spot for arts and crafts for schools, summer camps, senior centers, and similar locations. They give everyone a chance to enjoy being engaged in a project, plus messes are easier to handle than in an indoor setting. You can also conduct classes and team-building exercises at a group of tables.
HOW TO BUILD AN OUTDOOR DINING TABLE
There are all different styles of outdoor dining tables but if you're looking for a more doable table, be sure to look at this instruction. They're easy to build and will give you a great classic but stylish look.
TOOLS
- Miter saw
- Kreg jig
- Drill
- Measuring tape
- Carpenters square
- Sander
- Clamps
- Optional: router
MATERIAL
WOOD PRODUCTS:
- 4×4 boards
- 2×4 boards
- 2×6 boards
- 2×8 board
- 2×10 boards
- 1×6 board
- 1×4 board
OUTDOOR WOOD GLUE
- 1 1/4″ construction screws
- 2 1/2″ construction screws
- 4″ construction screws
- 2 1/2″ Kreg screws
STEPS BY STEPS
Step 1: Make the Table Base
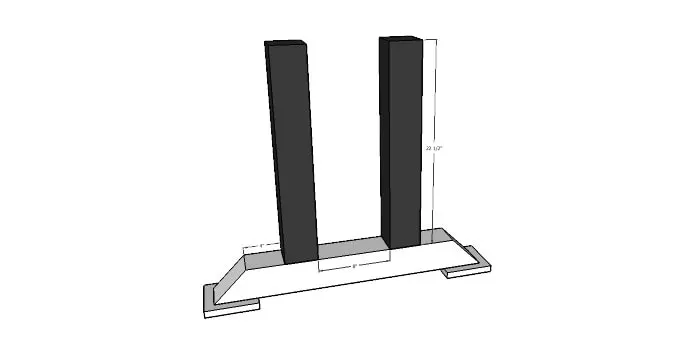
Cut four 5 1/2″ pieces from the 1×6 boards for the feet. Then cut four 30″ pieces from the 4×4 with each end cut at a 45-degree angle for the leg tops and bottoms.
If you want to add a decorative top to the table feet, use a router to add a decorative edge to all 4 sides of all 4 feet.
Attach the feet to the bottom of the table leg bottoms with wood glue and 1 1/4″ construction screws. Be careful not to attach the feet too close to the outside of the leg bottoms where it is angled or the screws will come through the top. Repeat for the other table leg.
Cut four 22 1/2″ table leg posts from the 4x4s.
Attach the table leg posts to the top of the table leg bottoms. Space the posts so they are 8″ apart from each other and centered on the leg bottom.
Predrill 1″ deep holes in the bottom of the leg bottoms and secure the legs with 4″ screws through the predrilled holes into the leg posts. Repeat for the other table leg.
Attach the table leg top to the top of the leg posts in the same manner as you attached the posts to the table leg bottoms. Make sure the posts are 8″ apart and center on the leg top. Repeat for the other table leg.
Step 2: Assemble Table Base Together
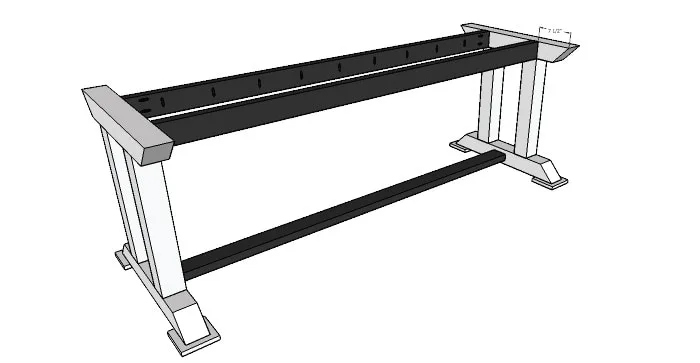
Cut three 77″ long pieces from the 2×4 boards.
Build the table base by attaching the tabletop supports with pocket holes so they are flush with the outside of the table leg posts. Add pocket holes to the top of the tabletop supports to attach the tabletop.
Attach the table leg support between the two table leg bottoms so they are centered on the table legs. Secure them with pocket holes.
Build tabletop
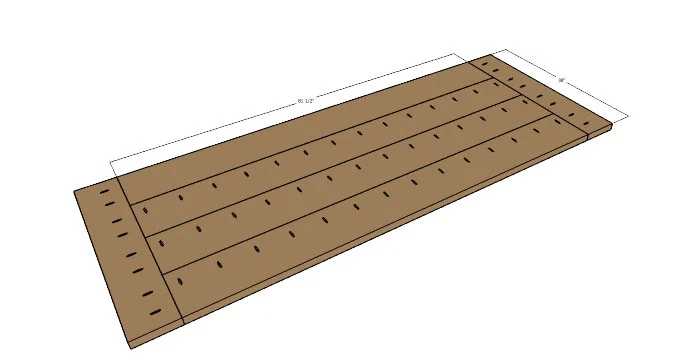
From the 2×6 boards, cut two 38″ pieces for the tabletop ends. Then cut four 81 1/2″ long pieces from the 2x10s.
Build the tabletop with pocket holes by attaching the 4 tabletop boards together along the length of the boards. Then add the 2 tabletop ends to the ends with pocket holes.
Secure the tabletop to the table base with pocket hole screws. Finish the table with outdoor approved stains and sealers.
Make your project easier with metal outdoor table legs/bases from Flowyline, why not?
Metal outdoor table legs and bases from Flowyline Design are highly crafted by handmade metal furniture makers, so they are prolonged to use, unique look, contemporary elegance, are budget-saving, easy-setting, and are easy to care for.
Go especially well with any of your table or benchtops, be it the live edge, wood, or epoxy, be it your custom table, dining table, console table, or oval butcher block table.
Decorate your house with the nicest and classiest furniture legs, create more comfortable and chill living spaces in your home so that improve your life qualities. This is probably a chance for all family members to do together.
These metal table legs and bases are always packed nicely, ready to be delivered to spruce up your living space, and come equipped with adjustable levelers hidden well in the feet. All you need to do is to bolt the base on your table or benchtop and go.


 Email Blog Entry
Comments
 Leave Comment


